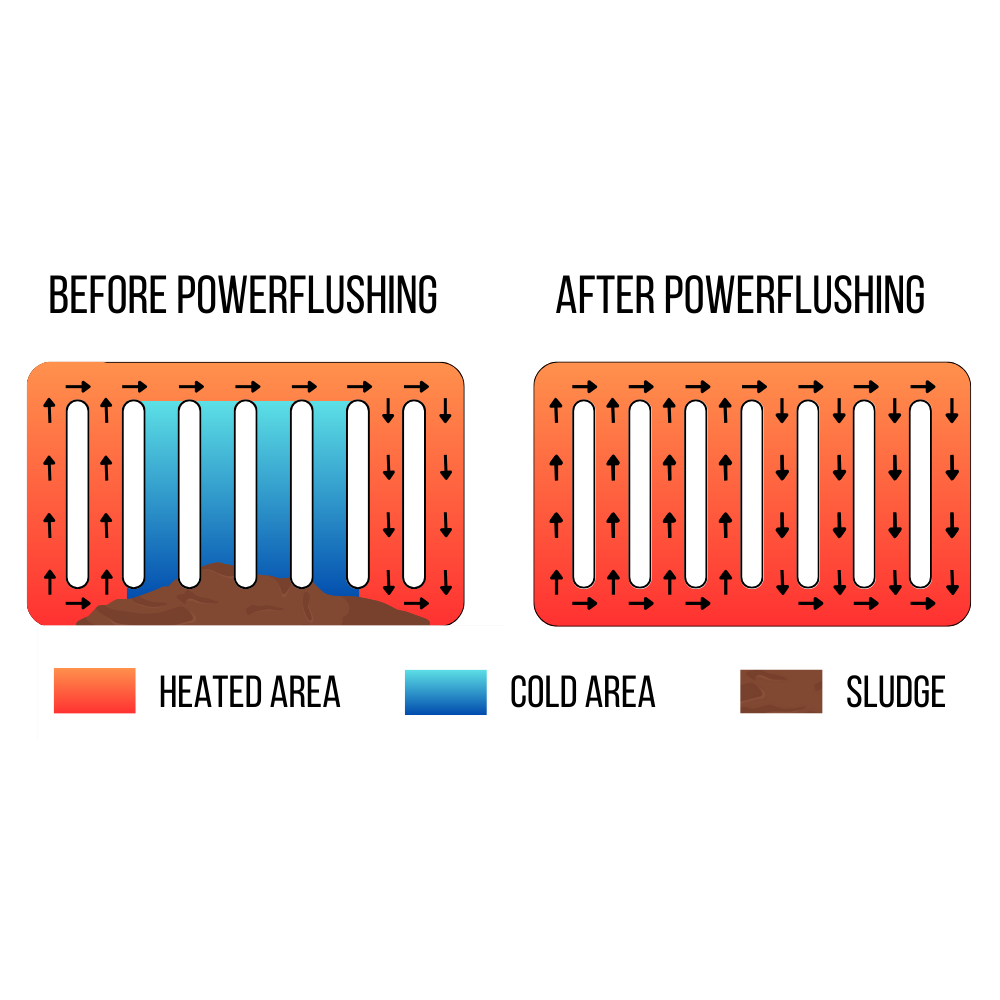
If your central heating system isn't working as effectively as it used to — exhibiting cold spots on radiators and requiring the boiler to work much harder to attain the same temperature — it might be time for a power flush. Regardless of the quality of your water—whether it's tap, softened, or demineralized — your central heating system will deteriorate over time, leading to the accumulation of limescale, sludge, debris, and other deposits. These build-ups can result in reduced performance, higher energy bills, clogged radiators, and even potential breakdowns. By power flushing your central heating system, you can restore its optimal functionality and extend its lifespan.
Can I do a power flush myself? You can hire a heating engineer, because power flush is a time-consuming and dirty job, but if you are ready for this challenge, you can definitely do it yourself. Carefully read our comprehensive guide, gather the necessary tools and begin the flushing process.
How to know that it’s time to clean your system?
Before proceeding with the power flush, you need to identify whether your central heating system requires it. Signs that indicate the need for a power flush include:
- Cold spots on radiators.
- The thermostatic radiator valve is stuck in the off position.
- The radiator is cold at the bottom, but warm at the top.
- The heating system warms up very slowly.
- Noisy boiler operation.
- Non-functional radiators.
If your system is in relatively good condition and doesn't exhibit any of these issues, but you want to improve efficiency, you can choose a chemical flush: a cleaner is added to the system and left to work for several hours or days, after which the water is drained and the system is replenished with clean water. However, if your system is full of thick sludge and causing circulation problems, you need a power flush. Power flushing is the fastest way to remove sludge from your heating system and possibly the one that will give you the best results.
For power flushing, you’ll need: a power flush machine, which you can hire in most tool hire shops, a cleaner like “ReDiant C5 Cleaner” to properly clean your system and and an inhibitor like “ReDiant H7 Protector”, to protect your system from junk building up again and prolong its lifetime.
Step By Step Guide:
Step 1: Prepare for flushing
Before starting the power flush, turn off your boiler and central heating system. Make sure they are completely cold before proceeding to the next steps.
Step 2: Find an access for the power flush machine
Find a convenient place to connect the inlet and outlet hoses of a power flushing machine. Consider that you will need easy access to raw feed water and an appropriate drain point. Potential places for connecting a power flushing machine to a central heating system might be via:
- Unscrewed automatic air vents;
- A dismounted radiator;
- A magnetite filter connectors;
- Disconnected boiler pipes;
- A dismounted circulating pump;
- Power flush pump adaptor
- Removed section of copper pipe
If you have an open-vented system, close off the feed and expansion pipes.
Step 3: Connect the power flush machine
Connect the power flushing machine to the central heating system. The way this is done will depend on what type of system you have and the type of machine you’re using. Follow the manufacturer's instructions for the correct setup. Once the machine is connected, put dumping and overflow hoses to a suitable drain or waste area. Fill the power flush machine to the max level with warm water.
Make sure that you have laid dust sheets or old towels all around the machine and the pipes used to connect to your heating system, just in case of any leaks or spillages.
Step 4: Begin the Power Flushing Process
When all the connections are in check, and the system is ready, you can start to flush. Open all the radiator valves and turn the power flush machine on, so water can circulate in your central heating system. During this time, keep reversing the flow of water regularly using the lever on the machine. Allow the machine to work for about 10 to 15 minutes.
After that time, turn the dump lever upright and open the inlet water valve. This will allow any dirty water to exit the system through the dump hose while new, clean water will circulate. Run the system until the water from the dump hose is clear.
Step 5: Add cleaner
When the water is clear, close both valves and set your power flush machine to circulation mode. Pour “ReDiant C5” or other cleaner that you have into the machine through an inlet which is in front of the machine. Continue to run the machine for another 15 minutes. Keep reversing the water flow every few minutes.
Step 6: Flush each radiator individually
After 15 minutes, flush each of the radiators individually. To do this, turn all the radiator valves off completely except for one. Turn on the machine and let it power flush radiator for 5 minutes. After that turn this radiator off and repeat the same with the next one. Continue this process until all the radiators are cleaned.
Step 7: Replenish the System with Clean Water
When you are done with all radiators open the dump valve and turn the water inlet on. Open all radiator valves, so water can circulate around the system. Run the machine till you see clean water running through the dump hose.
Step 8: Add inhibitor
Before disconnecting the power flush unit, shut off the drain and then add the right amount of “Rediant H7” or other good quality inhibitor and allow to circulate it for a good 10 to 15 minutes to ensure it reaches every part of the system. Take a sample of the system water and test using Molybdate test strips. If necessary, add more inhibitor, re-circulate and test again. Once you have confirmed system protection, the power flush is complete.
Step 9: Reconnect system
After the inhibitor is distributed through the system, close all valves. Disconnect all connections with the machine. Reconnect all items and release all valves to open and turn on water. Turn the boiler and any controllers back on, fire the system up, and allow it to get to the right temperature.
Step 10: Check the Central Heating System
Finally, bleed all the radiators in your home to remove any trapped air, ensuring that they heat up evenly. Check for any leaks, unusual noises, or malfunctions. The system should now operate more efficiently and effectively. That’s it, you cleaned your central heating system.
Power flushing your central heating system is a critical maintenance task that can significantly enhance its performance and longevity. How frequently you should clean your system depends on several factors, including its current condition, how you have been maintaining it till now and water quality. If you are using high-quality chemicals, it is recommended to do a power flush or chemical flush every 5 years.
By following this step-by-step guide, you can successfully perform a power flush and enjoy the benefits of a more efficient and reliable heating system. Remember to follow safety precautions and manufacturer guidelines throughout the process. If you're unsure about any steps or lack experience in power flushing, consider seeking professional assistance to ensure a thorough and successful cleaning.


